In this day and age, technology is at an all-time high and constantly improving our lives. An example of this is calorie tracking apps that provide us with an easy way to count our daily calorie and macronutrient intake.
These calorie counting tools are a fantastic way to see almost exactly what you are putting into your body on a daily basis. But, at first, counting your calories, carbs, fats, and proteins can be a huge hassle, especially when you’re transitioning into a ketogenic diet.
This is why I put together this article to help you learn how to track carbs on keto the easy way! By following the suggestions below, you will be able to reap the many benefits to knowing what is going in your body and how much of each macronutrient you need to eat to reach your goals. Now, you want the secret sauce, don’t you?
If you ask the Keto Community “how do you track your carbs on keto?” You’ll be flooded with a chorus of MFP (MyFitnessPal), Cronometer, and Carb Manager. Although there are other apps that are useful for carb and calorie tracking, the most popular tend to be these three.
In this article, we will be taking a look at how to use each one to track carbs on the ketogenic diet.
For your convenience, we’ve included a clickable list of the topics we’ll cover:
- Why tracking carbs is so helpful
- Pros and cons of MyFitnessPal
- Pros and cons of Cronometer
- Pros and cons of Carb Manager
- How to use MyFitnessPal
- How to use Cronometer
- How to use Carb Manager
- What is the best app for tracking carbs on keto? A side-by-side comparison
- Final thoughts and free resources
Why Track Your Carbs & Use A Keto Carb Counter?
You might be asking me, “What’s the point of using a calorie counter?” Well, there are numerous reasons to, including:
- Portion Control: As you increasingly read nutrition labels, you’ll realize that serving sizes are tiny. Manufacturers do that on purpose to get their macronutrients counts low and portray their product in a healthier light. By tracking your macros, you can develop a better feel for what serving size is optimal for you.
- Ninja Carbs: Some labels show that their products have 0 carbs, but you’d be surprised at how many things actually have carbs in them. Remember, 1g of carbs can really add up over a day’s worth of eating! Splenda used to be one of my favorite things to use because it had no carbs in it, but it actually has quite a few carbs if you are using it a lot.
- Mindless Eating: We overeat when we aren’t mindful of what goes into our meals. If you are experiencing a weight loss stall or unexpected weight gain, this could be why.
These are the main reasons why some keto dieters don’t get the results they are expecting. Luckily, as long as you use an accurate calorie and macro tracker, you won’t have to worry about any of these issues getting in your way.
That being said, you may come across one detour: finding the right app for you. Let’s take a look at the pros and cons of the top three tracking apps for keto to help you decide.
Pros and Cons of MyFitnessPal
MyFitnessPal is one of the most popular calorie tracking apps, and it’s free (unless you want extra features that are helpful for keto dieters). The app prioritizes social networking and progress sharing with friends, which sets it apart from other apps.
With a massive food database, you can find almost any food (or keto recipe) you desire on MyFitnessPal. However, the main reason for their massive database is that anyone who uses the app can submit anything they want. This makes it difficult to know which food item in the database you should choose.
The free MyFitnessPal app also doesn’t track net carbs, only total carbohydrates and fiber. This makes it a bit more tedious for keto dieters to use because they have to make their own net carb calculations.
Here’s a quick list of the pros and cons of MyFitnessPal:
Pros:
- Social sharing
- Weight loss/gain progress graph
- Huge food database
- Great for tracking packaged foods with barcodes
- Option to import recipes directly from your favorite keto recipe websites
Cons:
- Some foods and recipes will not be accurate
- Can’t track net carbs on the free app
- Can only use macronutrient percentages (not specific gram targets)
- Advertisements throughout the app
Pros and Cons of Cronometer
The biggest differences between Cronometer and MyFitnessPal are the food database and social media aspects of the apps.
Cronometer’s food database is curated — it only has validated, correct entries with a lot more detailed information (like micronutrients and amino acids). The app also lacks a social sharing side to it unless you buy the gold subscription.
However, there is one thing that sets Cronometer apart MyFitnessPal for ketoers — the ability to track net carbs and set a net carb limit (more on this later).
Here’s a quick list of the pros and cons of Cronometer:
Pros:
- Easy net carb tracking (with an option to limit sugar alcohols as well)
- More precise and accurate food database
- Offers multiple keto calculator settings
- Can change macronutrient and micronutrient goals by grams and percentages
- Allows you to track micronutrients
Cons:
- Limited food database
- Tedious process for adding recipes and new foods
- Occasional add pop-ups with free version
Pros and Cons of Carb Manager
Carb Manager is tailored specifically for anyone tracking net carbs, which makes it a great app for low-carb and keto dieters. Though it looks a bit different than Cronometer and MyFitnessPal, it has the same functionality of both apps. In fact, the app mitigates many of the cons mentioned previously.
Unfortunately, I’ve noticed several inaccuracies in the macronutrients of certain foods and Ruled.me recipes. This makes me more skeptical of the data on Carb Manager than I would be with Cronometer.
Here’s a quick list of the pros and cons for Carb Manager:
Pros:
- Tailored to the needs of the keto dieters, with net carb tracking and a keto grading system for foods.
- Allows you to track your progress, ketone levels, insulin, and blood sugar over time
- Access to keto information and a forum with other keto dieters
- Option to add recipes directly from your favorite keto recipe websites
Cons:
- Must pay a monthly subscription to track micronutrients
- Some recipes and food items are not accurate
- Big pop-up advertisements for its premium subscription service
How To Configure MyFitnessPal
Signing up for MyFitnessPal is simple. You can use Facebook or your email, and it will ask you for your goals, height, weight, activity level, etc. Feel free to change the units to whatever you prefer to use from here on out.
Keep in mind that you can adjust your calorie goals later if you wish. I find that using the keto calculator provides me with a more accurate estimate of how much I need to eat. After I use the calculator to find my daily needs, I plug it into MyFitnessPal.
Setting Your Macronutrient Ratios and Calorie Goals with MyFitnessPal
There are two ways (that I know of) to change your daily macronutrient and calorie goals using MyFitnessPal. Let’s stick with the easiest, more intuitive way:
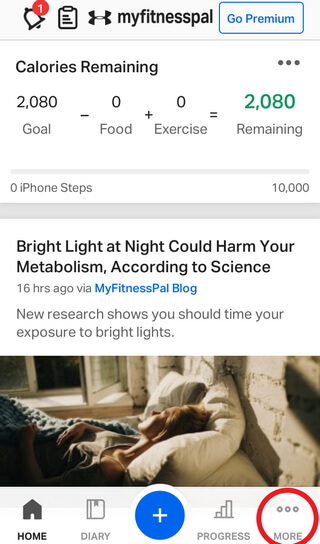
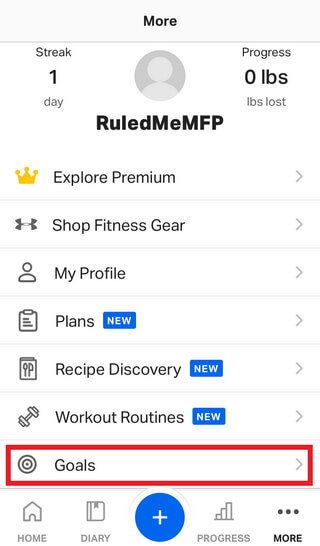
Tap on “More”, then tap “Goals”.
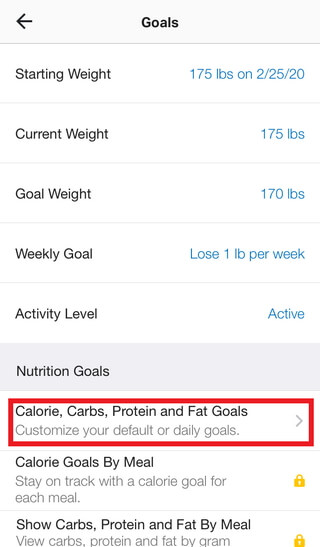
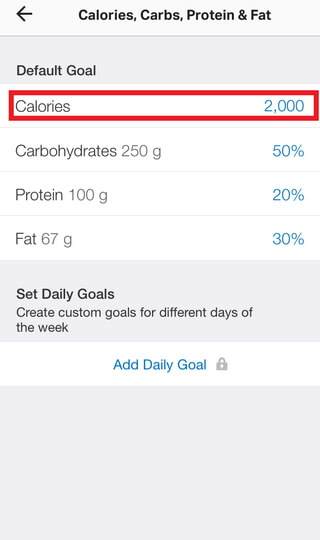
Here you can adjust your weight, activity levels, and weight loss/gain goals. Most importantly, this is where you can change your calorie and macronutrient goals. Tap “Calories, Carbs, Protein and Fat Goals”.
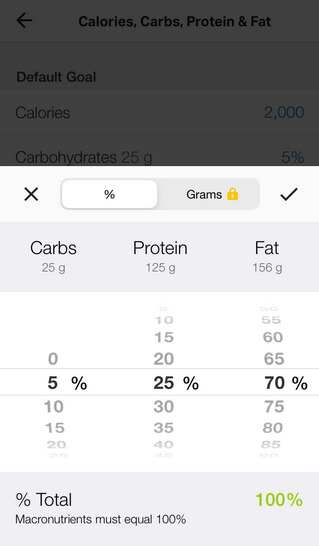
From here, you can select one of the macronutrients (carbs, fats, or protein) to change your carbohydrate, protein, and fat intake goals.
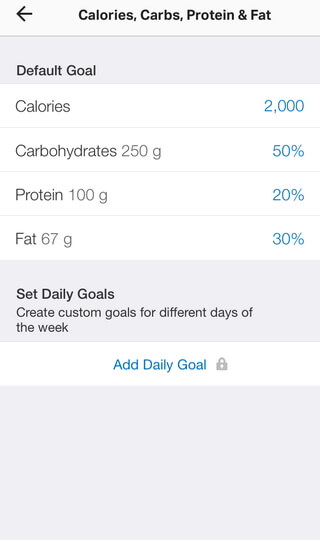
Use your finger to adjust the percentages until they look something like this:
Note: the app will not let you save your new macronutrient goals if they don’t add up to 100%.
If you want to be more precise by using the Keto Calculator, then play around with the macronutrient percentages until you get as close as you can to what the calculator suggests. Unfortunately, the free version of MyFitnessPal does not let you change your macronutrient goals by using grams.
Sometimes the calorie estimates are off as well. If this is the case, then you can tap on the calories row and change your daily calorie goal to match what the keto calculator says.
If you are not using the calculator, you can play around with your daily calorie allowance depending on how much weight you want to lose per week. This is up to you, but we recommend no more than a 30% calorie deficit.
Once you’ve double-checked your macronutrient intake goals, you can click the arrow on the top left of the screen to go back to the Goals screen.
If you would like to set additional nutrient goals and/or fitness goals, then scroll down and tap on the relevant option to adjust it. (Unfortunately, there is no option for “net carbs”, so you will have to calculate that on your own — there will be more on how to do that later in this article.)
Now that you have set your goals, you are ready to track your food consumption.
How To Track Meals Using MyFitnessPal
Click the back button until you are in the “More” menu. See the big “+” at the bottom? This is one of the many methods you can use to enter what you just ate.
Tap the “+” and choose the “food” button. Select whatever meal you are about to add in.
Now, you’ll be at a screen where you have many options. You can search for the food by tapping the search bar, you can tap the location logo next to the search bar to find a restaurant that you ate at, or you can click the barcode icon to scan the barcode of the food package. Most of the time, however, you will be using the search option.
For example, let’s log the eggs that I had for breakfast. To do this, we must search for the food item (or scan the barcode of the egg carton by tapping the barcode icon).
Look at all the options you get when you search “eggs”. Which one should you choose?
A useful tip to use when you are overwhelmed by options is to choose the item that matches the description of what you ate and has a green checkmark next to it. According to MyFitnessPal, the green checkmark logo means that the food has complete nutrition information and accurately reflects the nutrition information from the product packaging.
For this reason, I recommend tapping the logo to the right of “Search Results” to filter out all randomly entered foods, leaving behind the most accurate entries. This will allow you to get the best estimates for your fat, protein, net carb, and fiber intake with each meal.
Anyway, let’s get back to tracking breakfast. Let’s select the first “egg” result with the green checkmark next to it.
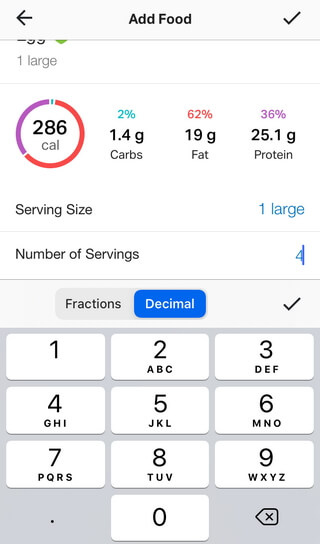
Here you can change the serving size and number of servings to accurately reflect what you ate just by tapping the appropriate row. Since I had 4 large eggs, I am going to leave the serving size as is and change the number of servings to 4.
This tells MyFitnessPal that I ate 4 large eggs, and it will accurately reflect this when I click the black checkmark at the top right of the screen.
Time-saving Tip: To enter multiple items at once, use the multi-add tool by tapping multi-add at the bottom of the search screen. Check off what you had, then search for the next item. To edit the servings and serving sizes, simply select the item you want to edit, enter the correct info, and tap the black checkmark at the top right to save the entry before searching for the next item.
How To Calculate Net Carbs For Each Food Entry on MyFitnessPal
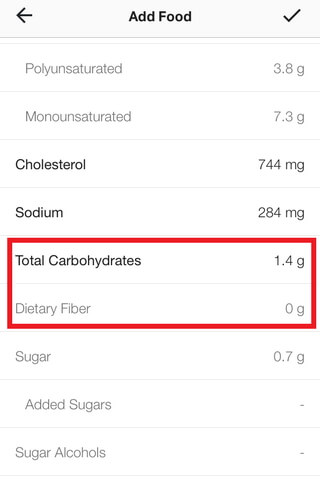
Before we leave this screen, let’s see what other information it has. By scrolling down, we can access all the nutrition info available on that food item.
We can also use this information to calculate the net carbs of that entry to make sure it fits into your daily net carb limit.
To do this, subtract the grams of fiber from the grams of carbs. For example, the four eggs I ate had 1.4 total grams of carbs and 0 grams of fiber. The net carbs = 1.4 – 0 = 1.4 grams.
This is such a small amount! This is why eggs are a staple of the keto diet.
How to Track Net Carbs Using MyFitnessPal
After a full day of keto-friendly eating and macro tracking, you have all the info you need to calculate your net carb intake.
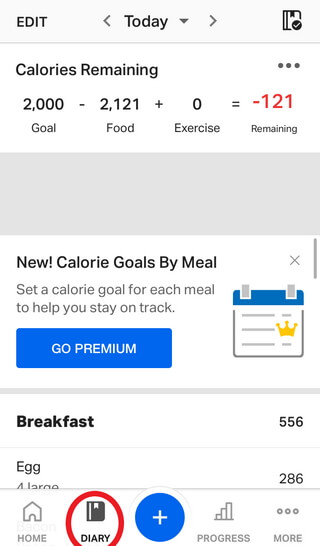
First, make sure you are in your food dairy by tapping the “Diary” icon to the left of the “+” sign. Tap on the banner at the top that has your daily calories remaining.
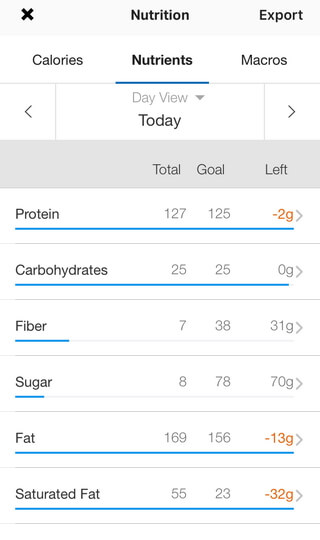
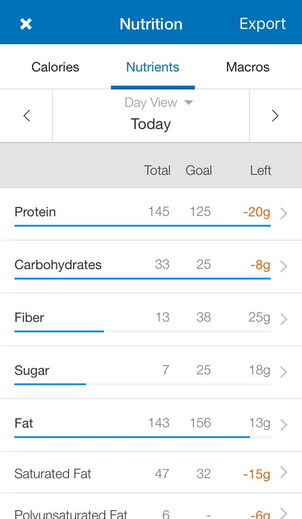
You’ll be taken to a screen that provides you with your daily nutrient breakdown. Here you will find all the relevant information that you need to ensure you are following the ketogenic diet correctly.
To calculate your net carb intake for the day, take your fiber number and subtract it from the grams of carbohydrates you consumed.
For example, after a sample day of beginner keto eating, I consumed 25 grams of carbs and 7 grams of fiber. 25 g – 7 g= 18 grams of net carbs — not bad!
How To Make Meal Tracking Easier with MyFitnessPal
After a couple of days using MyFitnessPal, you’ll notice that it is a pretty tedious task to plug in every single ingredient that you eat. If you are like me and have a couple of staple keto recipes that you always go back to, then you can make the macro tracking process easier by using previously entered recipes or importing your favorites.
Finding Your Favorite Keto Recipes
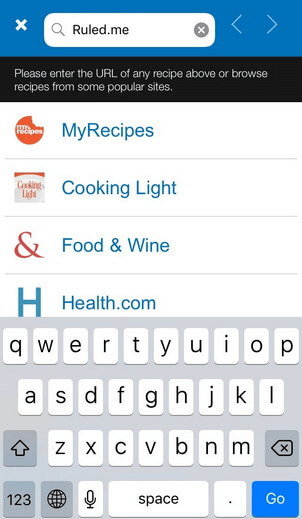
To use a previously enter recipe simply search “Ruled.me” in the food search bar:
Here you can look for your favorite recipes that have already been imported into MyFitnessPal. Just make sure you double check the nutrition information since other users may have made their own tweaks to the recipe.
How to Import Your Favorite Keto Recipes
If you are struggling to find the recipe you want to make, try importing it into the app yourself.
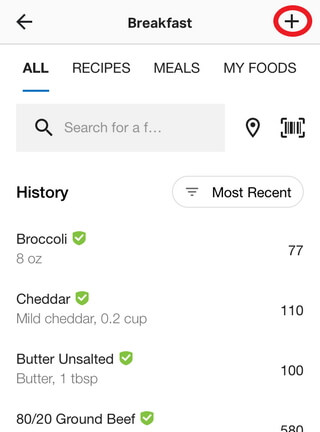
Simply tap the black “+” in the food search screen.
Then, select “Create a Recipe”:
You can either enter the ingredients manually or add them from a website.
To insert my favorite Ruled.me recipes, for example, I enter the website on the app and search through the website to find what I am looking for.
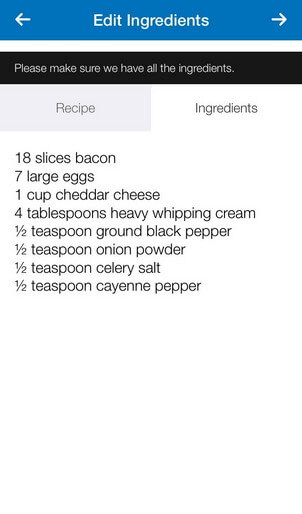
When you tap “Import Recipe,” the app will find the ingredients and write them down for you.
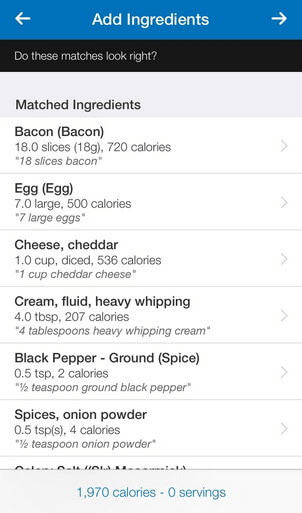
Click the arrow on the top right for the app to match the ingredients. If you find any ingredient that is inaccurate, then you can choose an alternative. Plus, you can add or delete any ingredient by choosing the options at the bottom of the screen.
Once everything looks good, click the arrow at the top right.
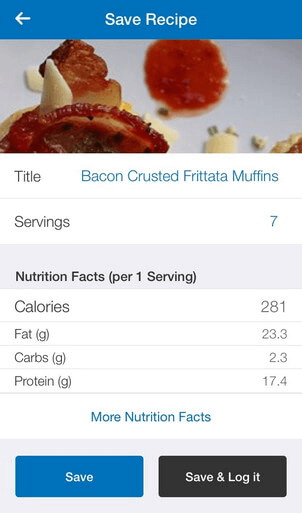
At the next screen, you have to scroll down all the way to see all the options. Here you can make sure the name, servings, and calorie breakdowns are accurate before you save it.
Once it is saved, you can log it at any time you’d like. All you have to do is click on the “Recipes” tab (found next to “ALL” on the food search screen), click on the keto-friendly recipe, and enter the number of servings that you ate.
How To Configure Cronometer
If you’d rather use an app that tracks your net carbs, micronutrients, and is much more precise and accurate, then I’d recommend using Cronometer.
Here’s how to set it up:
First, you must download the app and set up an account.
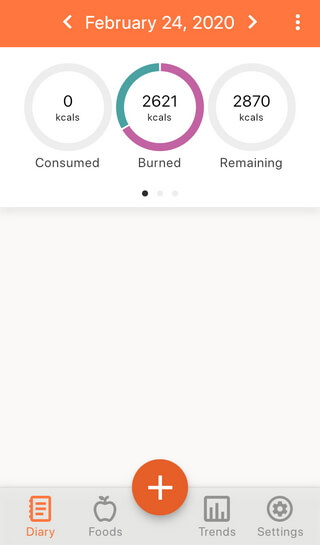
Once you end up at the following screen, you are ready to set your macronutrient and calorie goals.
How to Set Your Carb Limit and Macro Intake Goals with Cronometer
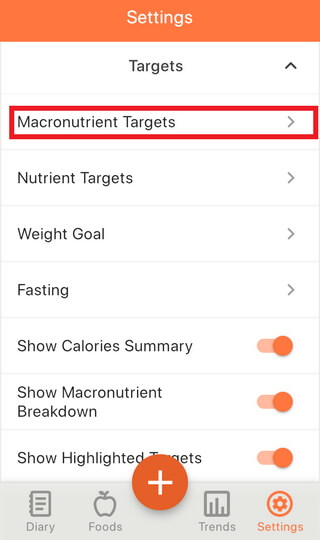
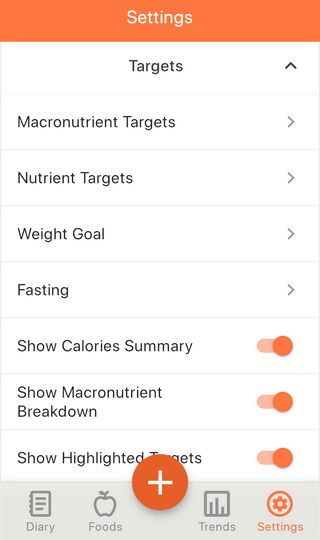
Tap on the “Settings” button (in the bottom right of the screen) and scroll down.
Here you will find all your information (which you can edit at any time) and your macronutrients and nutrient targets.
First, let’s set our macronutrient targets by selecting “Macronutrient Targets”
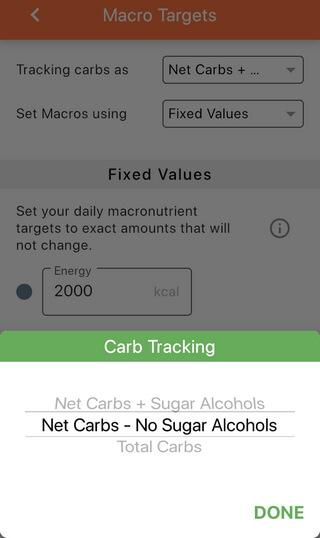
Firstly, you’ll notice the “tracking carbs as” option. This allows you to select the type of carbs you want to track: total carbs, net carbs + sugar alcohols, or net carbs without sugar alcohols.
Here’s a quick overview of the three options to help you decide what may be best for you:
- Net Carbs + Sugar Alcohols will add sugar alcohols into your net carb limit for the day. For instance, if you consume a keto cookie that uses erythritol as a sweetener, the grams of erythritol from that cookie will be logged as a net carb.
- Net Carbs – No Sugar Alcohol only counts carbs that aren’t categorized as a fiber or a sugar alcohol.
- Total Carbs shows you the sum of fiber, net carbs, and sugar alcohols.
As long as the only sugar alcohols you consume are erythritol and xylitol, the “Net Carbs – No Sugar Alcohol” will help you optimize your diet for ketosis.
However, if you eat low carb products that contain other sugar alcohols, such as sorbitol or maltitol, “Net Carbs + Sugar Alcohols” will be the better option for you (due to their glycemic effect). To learn more about sugar alcohols and the keto diet, read through our guide to keto-friendly sweeteners.
Once you’ve selected the appropriate carb tracking setting, you are ready to set your macros for keto.
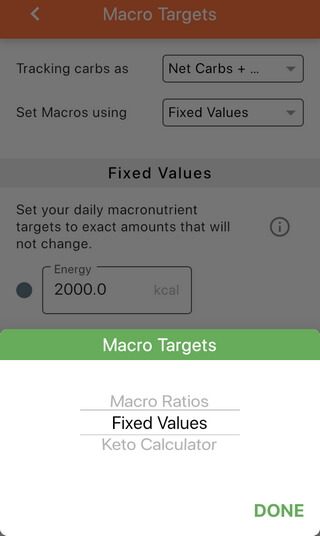
You can program your keto macros in one of three ways:
- Use our keto calculator to find out your daily calorie, fat, protein, and carb requirements, and plug them in after selecting the “Fixed Values” option.
- Use “Macro Ratios” if you’d rather stick with keto diet macro percentages (like the ones we used with MyFitnessPal).
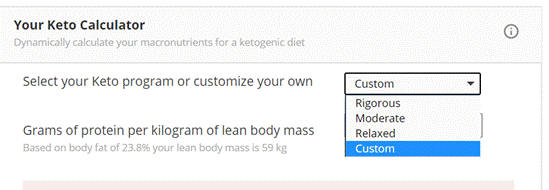
- Select the “Keto Calculator” option if you want the app to do the calculations for you. Feel free to use the following section to help you figure out which “Keto Program” to choose.
A Quick Overview of Cronometer’s Keto Calculator
If you select “Keto Calculator,” you will find different “Keto Program” options to choose from. According to Cronometer’s website, here is what each keto program represents:
-
Rigorous is recommended for people doing a ketogenic diet for therapeutic reasons (cancer, epilepsy, etc…) where limits on carbs and protein need to be very tight. This is also a good setting for people who are very sensitive to carbohydrates and cannot easily maintain nutritional ketosis without very strict limits.
-
Moderate should be a good range for most people practicing a ketogenic diet for weight loss or health benefits.
-
Relaxed can be used by people who are very athletic and/or have determined through self-monitoring that they can maintain ketosis at higher levels of carbs and protein.
-
Custom lets you edit any of the values as you and your healthcare team sees fit.
For those who want more in-depth info about how they calculate protein intake and net carb limits, here is how Cronometer describes it:
Your maximum protein is based on a multiplier for each kilogram of lean body mass (LBM). For strict ketogenic diets, this is typically 1.0 grams of protein per kg LBM, and the Moderate setting is at 1.5 gram protein per kg LBM.
It is also worth noting that pregnant and lactating women will have an additional 25 grams of protein added.
When it comes to setting your carb limit, here is what Cronometer does:
Your carbohydrate target is based on the chosen Keto Program. The Athletic Bonus will grant an additional 1 gram of carbohydrates for every 50 kcal of exercise. Those that are highly athletic can typically handle more carbohydrates without hampering ketosis.
If you’d rather have more control over your protein intake and carb limit, you’ll find the “Fixed Value” setting to be a better option. Simply plug-in your macros from our keto calculator, and you are good to go.
Once you’ve finished adjusting your macronutrient targets, go back to the settings menu where you can set your goals for other nutrients by tapping “Nutrient Targets” as well.
Here you can fine-tune your goals for nutrients like water, vitamins, minerals, and specific amino acids, fats, and carbs, as well as your daily calorie goals.
Now that you have all of your daily goals set and ready for a successful ketogenic diet, let’s learn how to track food consumption on Cronometer.
How To Track Meals Using Cronometer
Just like with MyFitnessPal, simply tap on the “+” sign to log a new entry.
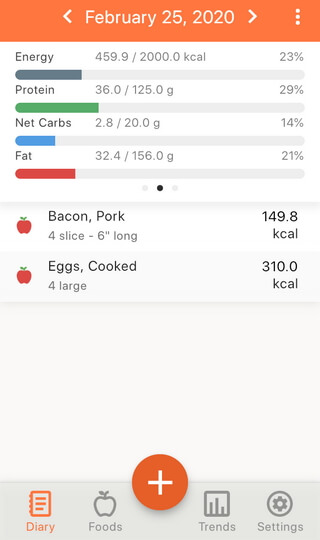
(Quick tip: To reveal your daily macro target, swipe left on the banner that is right below the date. This will provide you a much clearer picture of your daily intake goals.)
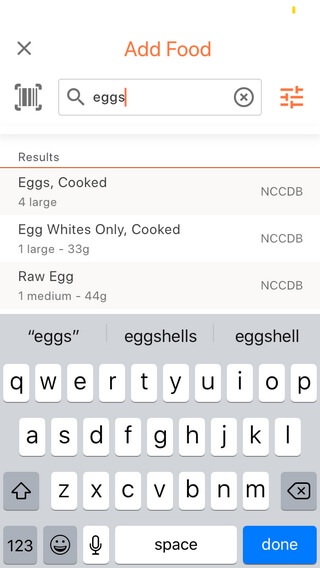
The food adding screen looks very similar to MyFitnessPal and functions similarly. You’ll find a search bar to type in the food you ate and a barcode scanning option as well.
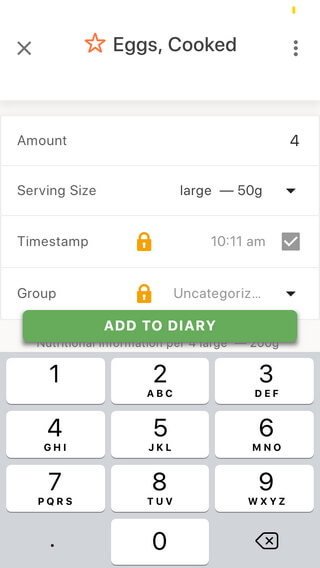
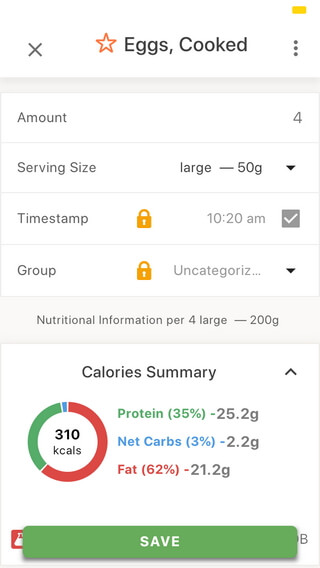
To add the four eggs that I had with breakfast to my food log, I type in eggs and select “eggs, cooked.” Since I ate four large eggs, I am going to change the serving size to large and type in 4 instead of 1.
As you can see, the great thing about using Cronometer for keto is that it gives me the net carbs for each item without me having to calculate it.
How to Know Which Search Result to Choose on Cronometer
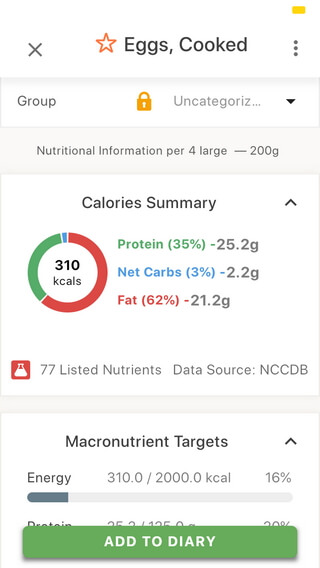
To select the most accurate food entry, look for USDA or NCCDB next to the listed item. Double-check to make sure the food has 50 or more listed nutrient values in the calorie summary.
For example, If I scroll down in the first search result for “eggs”, I see that this entry has 77 listed nutrients. This means that it will give me a complete picture of the vitamins, minerals, amino acids, and fatty acids when I log this option.
Once you’ve entered the right food, servings size, and amount, tap “Add to Diary”. This will add the food item to your food diary for the day, which you can see by tapping “Diary” on the bottom left of the screen.
If you are looking for more details (like your vitamin, mineral, and fiber intake), then simply tap on the middle of that banner (it doesn’t matter where), select “full report”, and scroll down to get all the info you need.
Making Meal Tracking Easier With Cronometer
Similar to MyFitnessPal, Cronometer has a multi-add option that can cut down the time it takes to enter your meals.
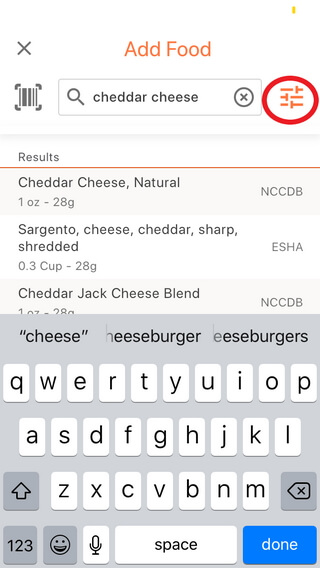
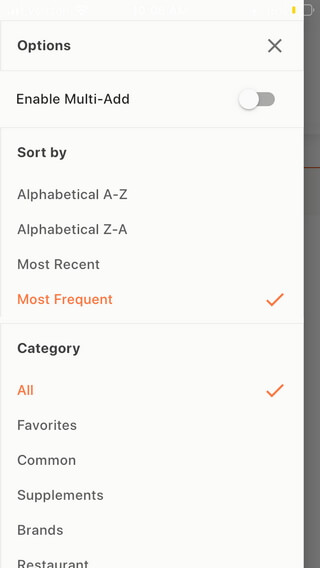
To access this feature, you will need to go to the food search screen and tap the orange icon to the right of the search bar.
Here you can enable the “multi-add” slider and change how your results are filtered.
With the multi-add enabled, you can now select multiple entries as once, review the servings, and edit each one before adding it to your food diary.
How to Add Your Favorite Keto Products and Recipes To Cronometer
Although you can’t import recipes directly from Ruled.me to Cronometer, you can still create your own recipes and add new foods to your app’s database for future use.
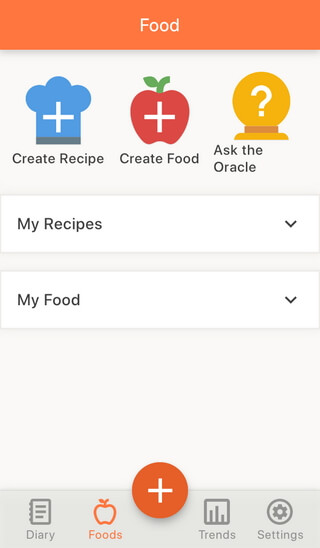
To add a new recipe or food, tap the “Foods” icon at the bottom of the screen.
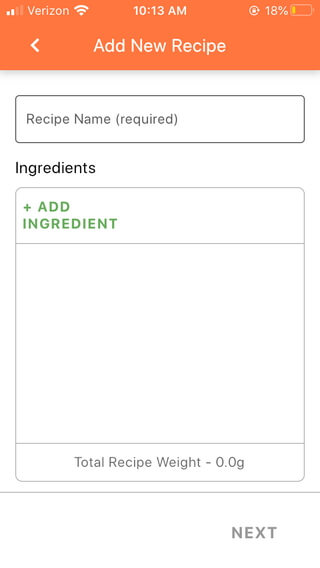
After that, tap the “Create Food” logo if you want to enter a keto-friendly item that isn’t in the database or “Create Recipe” if you want to add a keto recipe that consists of multiple ingredients.
To create a new recipe, simply click “add ingredients” and add them until it matches what you find in your recipe. After you are done adding the ingredients, change the servings and recipe name to your preference.
How to Track Net Carbs with Cronometer
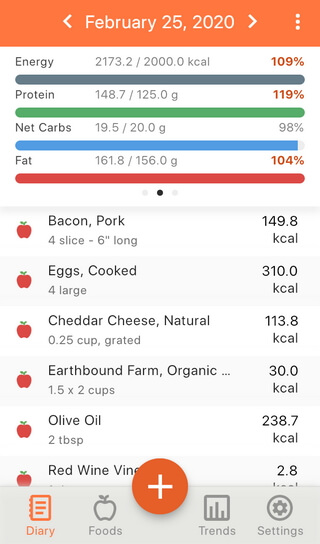
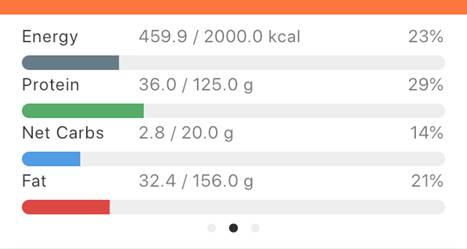
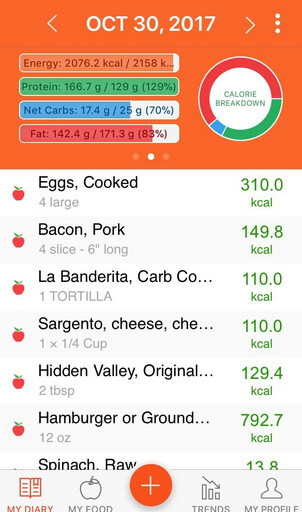
My favorite thing about Cronometer is how it shows you a progress bar for each macro as you add your meals in. This allows you to track net carbs throughout the day and adjust what you eat accordingly.
To make the macronutrient progress bars your default view, simply swipe left on the banner immediately below the date. The banner will look something like this at first:
After swiping left once, you will end up with the progress bars for easy and convenient tracking:
This banner will be automatically saved before exiting the app.
Please note: Your macronutrient goals will not be accurate until you follow the guidelines in the “How to Set Your Macronutrient Ratios and Calorie Goals with Cronometer” section of this article.
How to Configure Carb Manager for the Keto Diet
Carb Manager integrates many of the positive aspects of MyFitnessPal together with features designed specifically for anyone tracking their carbs.
The onboarding process is straightforward, but there are some aspects worth highlighting to make sure you get the most out of this app for your keto lifestyle:
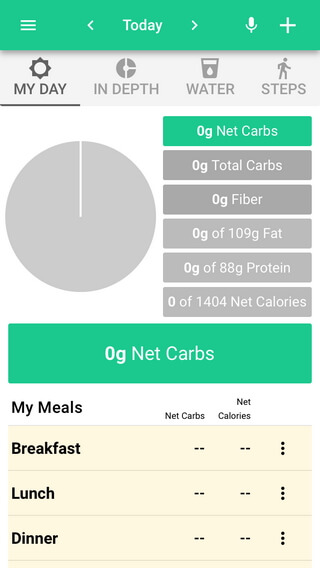
Once you reach the screen above, I recommend adjusting some settings before you start tracking. Settings can be accessed by tapping the white horizontal lines at the top left.
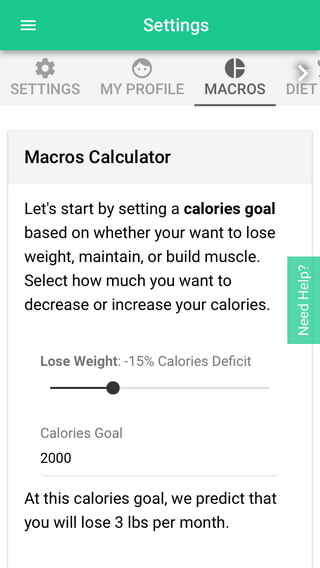
At the settings screen, select the “Macros” option. This is where you can set your calorie and macronutrient goals.
Though there are many ways to set your macros for keto, these two options are the simplest:
- Set the calorie deficit based on your weight loss goals. Scroll down, tap “Carbs:Protein:Fat Ratio,” and select 5:25:70 (Keto).
- Use our keto calculator and type the calorie calculation in the calorie goals box. Scroll down, tap “Carbs:Protein:Fat Ratio,” and select “Custom Grams.” Enter the gram calculations from our keto calculator and tap “APPLY MY MACROS”.
Once your macros are set, tap the horizontal white line logo in the top left, scroll up, and go to “My Daily Log”. The daily log screen is where you can start adding your meals and tracking carbs.
How to Track Your Net Carbs with Carb Manager
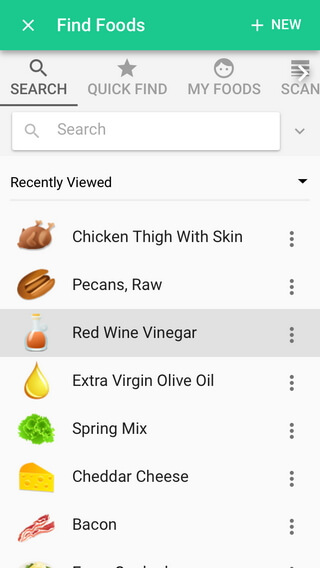
Tap the white plus sign at the top right on your daily log, and you will be brought to the “Find Foods” window:
Their search function works a lot like the MyFitnessPal app, allowing you to find foods and recipes from one search bar. To find your favorite ruled.me recipe, for example, type in “Ruled.me” followed by the recipe you are looking for.
Fortunately, you won’t have to do any extra math to track net carbs (like you would with MyFitnessPal). After you log each item, your net carb count (and your other macros) will automatically update themselves, giving you a clear picture of your macros for the day.
What is the Best Carb Tracking App for Keto? A Side by Side Review of Cronometer vs. MyFitnessPal vs. Carb Manager
If we compare the results of tracking the exact same meals side by side, we can see that MyFitnessPal, Cronometer, and Carb Manager are within 60 calories and 3 grams of net carbs of each other.
With 2,121 calories, MyFitnessPal had the lowest energy estimate for the day. However, this wasn’t far from Cronometer (at 2,173.2 calories), which is known for being a highly accurate tracking app.
From a net carb perspective, I noticed that MyFitnessPal was the least accurate (mostly because of an inaccurate Pecan listing). There was also a 1.5-gram difference between Cronometer and Carb Manager, which I traced back to Cronometer’s greater precision and a discrepancy between each app’s spring mix listing.
Overall, these discrepancies are small enough that they will not make or break your results. This means that the best app for keto ultimately depends on your preferences.
If you want to track your macronutrients, net carbs, vitamins, and minerals with greater precision (to the tenths decimal place), then Cronometer is the best choice.
On the other hand, if you would rather have a larger database of foods and recipes to choose from, then you’ll find Carb Manager or MyFitnessPal to be the better option.
Final Thoughts and Helpful Keto Resources
No matter what carb and calorie tracking app you choose, I hope you now know how to utilize these calorie tracking tools to make the most out of your efforts on a keto diet.
It’s extremely beneficial to keep a log of what you are eating, especially in the first 2 months that you start. In fact, a 2011 meta-analysis of 22 studies on self-monitoring found that “all [15] of the 15 studies that focused on dietary self-monitoring found significant associations between self-monitoring and weight loss.” In other words, tracking your calories is a great way to boost your results.
Personally, I’ve been logging my food for years now, and it has helped me reach my goals more quickly and easily. Tracking my food intake also helps me understand what I need more of in my diet so that I can be as healthy as possible.
And since I eat almost the same thing every day, logging what I eat has become super simple because the apps now have my favorite recipes and most frequent foods ready to be selected without me having to search for them every time.
Cronometer, Carb Manager, and MyFitnessPal have their pros and cons, but one is not — beyond a reasonable doubt — better than the other. Each app will give you the functionality that you need to track your calories successfully and get the most out of your ketogenic diet. The calorie tracking app that you choose is up to you and your personal preference.
Now that you know how to track your macros, you’re ready to take the next step toward improving your health and losing fat. If you’d like to turn that small step into a giant leap forward, we’ve included several helpful resources below:
- Our 14-day Meal Plan — One month of keto meals mapped out for you
- The Keto Diet and Weight Loss Plateaus — Learn how to break through your weight loss stall
- How to Find Your Ketogenic Carb Limit — Dive deeper into the science of ketosis and how you can use it to personalize your carb counts.
- 5 Keto Diet Hacks for Optimal Results — Simple changes you can make to reach your goals and maintain them for the long-term

